Chapter 2: Installing and Using NetStores

|
Chapter 2: Installing and Using NetStores |
Depending on which type of storefront interface you decided to use, you'll perform different steps to set up your product list so NetStores can use it. This section, and the one on "Setting up the search (gen-srch) interface" describe the steps for creating stores with the various NetStores interfaces.
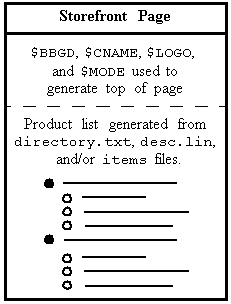
The storefront for the gen-cat interface includes any introductory text and images you want to use followed by a list of all your products. Internally, the catalog interface uses a hierarchy of directories and a series of HTML pages for each item. It also generates forms for ordering.
"Browse a small catalog (gen-cat)" For an online example of this interface, see http://www.netstores.com/dwos-bin/gen-cat?vcp or http://www.netstores.com/dwos-bin/gen-cat?dwts (use "1" for the account number and "captain" for the password.
The gen-cat interface can use the same set of files to keep track of customers,
transactions, and orders as the gen-srch interface. However, instead of listing
the items in itmfil.asc, you create an
item hierarchy in the catalog directory.
Before you begin creating files, decide on the hierarchy of products you want to offer. For example, if you are selling pet supplies, your top-level categories might be Food, Toys, Grooming tools, and Training tools. Or, you might start with categories for Cats, Dogs, Birds, and Fish. It's helpful to draw a diagram or make a list of the product hierarchy you plan to create. For example:
You can have as many category levels in your hierarchy as you want. Also, different branches of the hierarchy can have different numbers of layers. Your hierarchy of categories and products will appear in nested bulleted lists on your storefront page.
Within each category of products, you can choose between two methods of storing prices and item descriptions. You can use different methods for different product categories.
./dwos/data/store-abbrev/catalog directory.
cats" and "dogs".
directory.txt
in the directory that contains the new subdirectories.
In the directory.txt file, put your description of this set
of categories in HTML format. This file will be included as a bulleted list
item and the text will be displayed in bold. Your description can be a single
line of text or lots of text with images and any HTML formatting you want
to use. (If you want to turn off bolding, put </B> at
the beginning of the directory.txt file and
<B> at the end of the
file.)
PULL124" and "CHEW246" in the
"dogs/toys" directory.
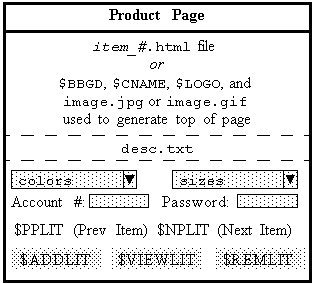
NetStores creates a page for each item is using the files and parameters shown
here:
PULL124" directory, create a file named
"PULL124.html".
This HTML file begins the page, so it should include
<HEAD>, <TITLE>, and
<BODY> tags. However, other files come after it, so don't
include any </BODY> or </HTML> tags
to end the page.
If you want to include the same image in many pages, put that image in the
./dwos/data/store-abbrev/images directory
and reference the image in the HTML file as if it were located in the
/store-abbrev/images directory. (You created
a link between these two directories in the section on
"Creating directories and files for a store".)
If you want to include an image for this product only, put the image in the
./dwos/store-abbrev/catalog/category-path/item_#
directory and reference the image in the HTML file as if it were actually
located in the
/store-abbrev/catalog/category-path/item_#
directory.
image.jpg or
image.gif file in this product directory if you place one there.
NetStores uses the $CNAME, $BBGD, and $LOGO parameters you defined to do this.
desc.txt if you
place it in the product directory. This file can contain any HTML you like.
For example, you may want to copy standard headers to the
item_#.html files and put product descriptions extracted from
your catalog in the desc.txt files.
items (in the category directory) with the following format:
Item_#|Item Name|Price
For example:
    10003|Large Dog House|79.95
    10004|Cat Bed|29.95
    20001|Dog Training for Dummies|19.95
styles that lists the product subdirectories in the order you
want them listed on the page. Put one directory name on each line. For example:
      CHEW100%_DOG
      CHEW345_DOG
      FETCH678_DOG
desc.lin that contains a one-line description of the product.
colors that lists options (one per line) for a variable that
does not affect the price (see the description of the "color"
variable above). Your file might look like one of these examples:
|
    Cardinal Red
    Snow White
    Forest Green
    Royal Blue
    Deepest Black
|
You can also use a colors file if you are using the "items"
method. This is because the colors file does not affect the
price. If you use a sizes file, you must create all the files
described in this list (except the colors file, which is optional).
sizes that lists options for a variable that does affect
the price (see the description of the "size" variable above) in the following
format:
Option description|#
where # is a number that will match the number in the
prices file you will create in the next step. Your file might
look like one of these examples:
    100 orders/month|1
    150 orders/month|2
    250 orders/month|3
    500 orders/month|4
    Unlimited|5
|
    6" tall|1
    9" tall|2
    12" tall|3
    15" tall|4
|
sizes file, you must also
create a prices file in the same directory to list the price
for each option in the sizes file in this format:
#|price
where # matches the number in the sizes file. Your
file might look like this:
    1|99.95
    2|199.95
    3|299.95
|
./dwos/data/store-abbrev/params.sh to control
what the links to the next and previous page say:
<IMG
SRC=/store-abbrev/images/backbtn.gif>"
<IMG
SRC=/store-abbrev/images/nextbtn.gif>"
./dwos/data/store-abbrev/params.sh to control
what the buttons on the order form say:
./dwos/data/store-abbrev/params.sh to control
the length of the fields in the order form and order acceptance form for
customers using browsers that may not support tables:
| NetStores Administrator's Guide | |
|---|---|
|
|
|